Curly Girl Review: it’s a 10

5611BF6E-9BAA-4B25-A742-CDF8F80BD1F8

With a name like “It’s a 10” you can’t help but have high expectations that you’re about to have a bomb wash and go. Am I right?! So did the product live up to its name you ask?

I had the chance to use this product twice before writing this review and the answer is yes! Just as the name states, it’s a 10! I loved my results. It defined my spiral curl pattern, while leaving my hair very soft and manageable. I love a product that can define my curls and still give me soft fluffy hair with no stiffness or “crunch.”

The two main reasons I was pleasantly surprised and won over by this product:

1. I’ve mentioned in previous posts how I prefer not to use hair styling creams on my first day hair as it tends to weigh down my curls. When I try out a cream on my wash day, I go into it not expecting any spectacular results. However, this styling cream proved me wrong! It was light weight, and gave me defined curls with a hold.

2. This was by far one of the easiest wash days I’ve had! My wash days usually consists of a mixture of products from washing to styling products. I call it my “curl cocktail” lol. With It’s a 10, I only had to use two products; one to cleanse and condition in one step and one cream for styling. With this one cream, I got the same great results compared to when I use a mixture of two to three styling products. That, I have to say was impressive. Especially because creams usually don’t work for me.

Take a look at my results!

Processed with VSCO with 6 presetProcessed with VSCO with 6 presetProcessed with VSCO with 6 presetProcessed with VSCO with 6 presetProcessed with VSCO with 6 preset

Side note: Along with a well working product, a great curly cut can help advance the look of your curls as well! I have what’s called a RëzoCut (click on the link to see previous post on my first RëzoCut experience) done by Nubia at Utopia Day Spa & Hair Salon

Also, if you’re curious about how I dried my hair…I air dried it for about an hour, then finished drying it with a diffuser.

Until next review…thanks for stopping by! xo

My (updated) Wash and Go Routine


My go-to wash and go routine still includes DevaCurl, but I switched the product line up a bit. This routine has been responsible for most of my good hair days lately…so of course I had to share my new holy grail!

Step by step instructions:

1. Cleanse hair with DevaCurl’s No Poo followed by DevaCurl’s One Condition

2. A good deep conditioning can give your hair a major boost! I like to use DevaCurl’s Melt into Moisture. I apply it after washing my hair, afterwards I put a plastic cap and leave the treatment on for at least an hour.

3. After rinsing off the treatment, do not dry your hair with a towel. (If you apply the product while your hair is still very wet, it will result in more defined curls with less frizz). Split your hair into two parts and apply a little bit of the One Condition (I like to use it as a leave in). Use the raking method to evenly distribute it throughout your hair. Repeat on the other side.

4. Flip your head upside down and gently shake out the roots with your finger tips.

5. Scrunch DevaCurl’s Light Defining gel onto your hair. Keep scrunching the product onto your hair until your whole head of hair is saturated in the product. As you’re scrunching you’ll squeeze out some of the excess water. Also, squeeze and hold for a few seconds to help define your curl pattern.

6. Repeat the scrunching process again, but this time with DevaCurl’s B’Leave In gel

7. Scrunch and shake out your hair one last time. Then take a microfiber towel and  squeeze out all the excess water.

8. Shake out your hair and flip your head back up. You can now go ahead and create a part. I usually part my hair to the side but feel free to do a middle part or let your curls kind of fall into place.

9. Finally, you can air dry or use a diffuser to dry your hair. I prefer to air dry when I have the time.

BA4C1FF9-2F43-422B-9290-DDC8F591442E

How to get big curly hair FT. Curls blueberry bliss products

IMG_6449 (1)

Do you struggle with flat hair? Want bigger and fuller looking hair? Find out how I went from flat hair (in the left photo) to fab (in the right photo) without using a diffuser!

What you’ll need: A hair clip or hair tie, Curls Blueberry Bliss Hair Growth Oil, and your fingers!

Step 1: Wash and style as you would do normally. I used my current fave, Curls Blueberry Bliss Reparative Leave In conditioner and Curl Control Jelly to style. If you have yet to try these products…please do! It’s definitely on my “must-have” list! Thank me later 😉

Step 2: Once your hair is 100% dry, grab your hair tie or clip and section off a small piece of your hair. Start with the hair closest to the nape of your neck and work your way up. (You can do this process on first day hair or 2nd or 3rd day hair. The photo on the left is first day hair, hence why it’s so flat! lol. I personally prefer to do it on 2nd day hair. For the sake of getting my video done, I went ahead and demonstrated my process on first day hair).

Step 3: Use Curls Blueberry Bliss Hair Growth Oil on the tip of your fingers to start separating your curls. Focus on the curls that are clumped up.

*By separating the clumped curls, you will be giving the illusion of fuller hair. Also, using a oil in this step is crucial. It will help your fingers glide through your tresses, minimizing frizz, while helping to maintain the curl definition. My top choice is Curls Blueberry Bliss Hair Growth Oil. My favorite thing about this oil has to be the scent, once you pop that cap open, you’ll want to eat it! haha. It’s always a plus when your product smells AH-MAZING because it’s so close to your nose, you’ll be smelling it all day…so might as well have a yummy scent! Besides the smell, this oil has a lot more positives. First of all, its meant to repair and restore damaged hair, while preventing breakage and increasing hair growth due to the blueberry extract in its ingredients. It’s also very light weight. I sometimes have a problem using oils, as they sometimes tend to weigh down my hair. However, that’s not the case with this oil…it does the job just right! It also gives your hair a really nice shine, your curls will glisten and look healthy versus other oils that just make your hair look too greasy.

Step 4: Once you are done separating each curl in that section, fluff that section out at the roots with your finger tips.

Step 5: Repeat steps 3 & 4 through out your entire head.

Step 6: Once you completed your entire head, flip your head upside down and FLUFF, FLUFF, FLUFF!!! Don’t be scared, shake up those roots! Fluffing will help give you even more volume. Now when your done fluffing, scrunch up your curls, and then give it one last fluff and voila!…you know have fuller looking hair with a whole lot of volume!

Now say it with me…”BIG HAIR, DON’T CARE!” 😉

Hope my step by step guide and video helps you achieve your BIG hair! xo

My Experience at Utopia Salon & Day Spa

image4-4

Hey guys! I was recently invited for a curly cut by Utopia Salon & Day Spa Owner and Master Curly Stylist Nubia Suarez. I wanted to share my experience at the salon with you all. Utopia Salon & Day Spa is a full service salon located in Westfield, NJ and one of their specialties is servicing curly girls and guys. I am a Jersey native, so I was especially excited to find out there was a salon that catered to curls in Jersey. I usually take a trip to NYC for such services. I was also excited to share this location with all my fellow Jersey curly girls, as I often receive questions on where to go in Jersey for curly cuts or styling.

I’ll admit I was a bit nervous at first to visit a whole new hair salon and curly stylist, but I did some research before hand and checked out some of Nubia’s work. I liked what I saw, so I decided to go for it! And I’m SO GLAD I did!!! It was all positive vibes from the minute I walked in! Upon arrival your greeted by a sweet and friendly receptionist and offered your choice of a mimosa, juice, coffee, or water. I’ll have a mimosa please! (Hashtag I love me some mimosas! haha). I think little things like that show that the establishment wants their customers to feel special and makes the customer’s experience as a whole a little more enjoyable. Not to mention you feel like you get a little more bang for your buck…Cheers to that! It was really busy when I arrived, with all type of clients. However, the receptionist still managed to acknowledge every client that walked in. Even if she couldn’t get to you right away she made sure to greet you and let you know she would be right with you. I only include this piece of information because, well as we all know first impressions are important. As a new client, the fact that I felt welcomed and comfortable as I walked in, set the mood for the rest of my experience at the salon.

I was then finally introduced to Master Curly Stylist, Nubia. She was so welcoming and sweet. We spoke about what I liked and didn’t like about the shape of my hair before starting the process. I could tell she had a true love for styling curly hair and that it was her ultimate goal for each client to leave her salon happy and in love with their locks. We spoke curly talk, we laughed, shared some stories and before I knew it, she had my curls all shaped up and ready for the styling process. As I laid back and let her wash and style my curly locks, I couldn’t help but notice the interactions between Nubia and her clients and co-workers. She knew all her clients by name, as they came up to her and greeted her with hugs and kisses. She also showed a lot of knowledge in hair products and curl texture as she instructed her co-workers which products, hair dryers, and curly technique to use for each client. Every curly girl in that salon had a styling process catered to their specific curl pattern. It proved that she was dedicated to curl care and styling.

In all, it was a wonderful experience. I’m so glad she provided me with the opportunity to see her work first hand and have her work her magic on my curly tresses. I loved my results, as she did exactly what I asked for. (Follow me on Instagram @Style_Dose and stay tuned to see photos of my curls after the cut). Nubia was so sweet and humble, knowledgeable, and was nothing short of hospitality! I would definitely recommend this salon, I myself will be visiting again!

image1-11image2-9image3-5image3-6image4-3image1-14image1-12image2-10image5-1image1-13

Blueberry Bliss Curl Collection Event

Hey guys! I had the pleasure of playing hair model for a Curl’s Beauty Editor event to showcase their Blueberry Bliss collection. My first hair event of the new year…and I wanted to share the experience with you all! Also, I’ve been addicted to some of their hair products lately, so I thought I’d go ahead and keep my fellow curlistas updated on my latest hair product obsession! If you’re curious which products I’ve been using and loving for a wash and go, it’s the Blueberry Bliss Reparative Leave In Conditioner along with Blueberry Bliss Curl Control Jelly. I’ll be trying out some other products from the line, now that I got my awesome goodie bag…hehe. I’ll be sure to keep you guys posted on my thoughts!

Here’s some shots from the event and of course my finished look that was styled with products from the line:

image4-2image6image5image1-9image2-7image3-3image3-4image2-8image1-10


Curly Girl Review: Rapunzel “The Future of Hair”


IMG_7926

Hey curl friends, who wants to know what hair products I used to achieve these awesome results?! I had the pleasure of trying out some great products from Rapunzel. The end results left me with soft and shiny curls.

I used the following products from the Rapunzel line:IMG_7935

Rapunzel’s Hair Silk: made to smooth ends, condition, and when used daily aids in minimizing breakage and damage caused by chemicals and heated styling.

I loved that this product helps to protect your hair from chemical damage, since I dye my hair often. This oil also gave my curls some amazing shine! You can clearly see the difference in the photo above. In the “before” photo my hair looks dry and dull versus the “after” photo where my curls look shiny, moisturized, and even glisten in the light.

Rapunzel’s Hair Lotion: A deep moisturizing cream made with Shea Butter and other natural oils that promote healthy hair growth while protecting the hair from damage.

I was amazed how soft this cream left my hair…and when I say soft I mean SUPER-DUPER soft! (yes, I said super-duper I had to emphasize on how soft my tresses were! lol)  My comb and fingers literally glided through my hair, melting away any signs of knots that were ever there. It also did a great job at adding moisture to my hair and making it more manageable.

Rapunzel’s Hair Therapy: Hair multivitamins that help prevent hair loss and breakage from occurring.

I have been taking these vitamins consistently for a few days now and I believe I will see results. These vitamins contain a perfect dose of iron, which is an important ingredient when trying to promote hair growth because it carries oxygen to your roots.

Here are some more “after” photos…just because who can resist taking selfies when your new hair products are giving your hair LIFE!…haha.

What do you guys think of my results? I loved the outcome, whats not to love about healthy, silky, and shiny looking curls! If you’re interested in seeing a step by step on how I applied the product press play in the video below:

To find out more information or purchase any Rapunzel hair products please visit Rapunzelthefutureofhair.com

Screen Shot 2016-06-18 at 4.27.45 PM


Curly Girl Review: Adore Botanicals


Screen Shot 2016-05-01 at 4.56.54 PM

How many times do you try a new product before giving it your final verdict? I like to try my new products more than once before I decide if I love it or hate it; I hardly ever fall in love with a product the first time using it. Sometimes, I have to experiment with it by applying it different ways, or mixing it with another product to find the best results. However, once in a blue I’ll find a gem when it’s just love at first try! This Adore Botanicals line was indeed one of those gems. I absolutely loved my results the first time around, no experimenting needed!

image1 (8)

I mean look at those results! On the left is my hair (looking a hot mess…haha) unwashed and ready for some major loving. On the right are my results after using Adore Botanicals deep conditioning treatment and styling products. Oh and here’s another major plus about this product line!…Not only was this product formulated to nourish your hair, it can also be used to nourish your skin! Yes, that’s right these products can be used to promote healthy skin as well. A product that can nourish your hair AND skin is a winner in my book! To Achieve the look on the right I used the following Adore Botanicals products:

  1. Daily DewIndulgent Hair & Body Oil as a deep oil treatment
  2. Blooming Moisture MistDaily Moisturizing Leave-In Conditioner as a leave-in
  3. Florets & CremeIntensely Nourishing Moisturizer to style

The “Daily Dew” worked wonders as a treatment! I parted my hair into four sections and saturated each section with the oil from the ends up to the roots. (Note: Be careful not to over do it with the oil to avoid a greasy aftermath). I used a plastic bag to cover my hair and left the treatment on for about forty-five minutes. After the forty-five minutes passed I washed my hair as usual. This oil treatment was everything! I hardly had to detangle my hair afterwards, it had melted away almost all of my knots. My hair was super soft after just one use and my scalp felt so fresh and so clean, clean! (hehe). I will probably start using this treatment every other week, that’s how much I loved the results. I then sprayed the “Blooming Moisture Mist” all over my hair. I always like to leave some conditioner in my hair after washing it, so I was excited that this line had a leave-in conditioner spray. The combination of the oil treatment along with the leave-in spray left my hair looking shiny (not greasy) and healthy. Lastly, I used the “Florets & Creme” to style my curls. I was a little skeptical at first to use the creme as a styling product because I usually don’t use hair cream on my freshly washed hair. The reason behind that is, hair cream is not the best product for my curl type. When I use creams on my freshly washed tresses it tends to weigh down my curls, not allowing them to curl up as tight as I like my curls to be. To my surprise, that was not the case at all. I was surprised to see how well the creme was defining my curls, it was like Spring in my hair as all my curls were springing up for joy! That had to be the cherry on top, I had fallen in love. The picture doesn’t do it justice, I wish I had documented the stages of my curls as they were drying, the creme had formed my hair into perfectly defined little ringlets all over. Due to my rushing out the house that evening, I had to wait until the next day to take the photo. But it just goes to show how good my hair still looked for it to be “second day hair”. Altogether, these products left my hair just SUPER soft! My hair was the softest I have ever felt it, I could actually somewhat run my fingers through my it. This was an awesome line and I’m so glad I tried it! I suggest you do the same!

Here’s a little bonus for you guys, I recorded how I applied each product. Press play to check it out!

To purchase or find out more info about the previous products, visit www.adorebotanicals.com

Until next review my curly loves! xo

Curly Girl Review: Madonna & Co Miracle Hair Gel

miracle gel

A curly girl can never have too many hair styling products! Today, I’m sharing my results after using Madonna & Co’s new Miracle Hair Gel. For those of you who are not familiar with Madonna & Co, it’s a boutique and beauty bar. It’s a place that brings together beauty and fashion all under one roof. Although their beauty bar deals with all hair types and textures, they do specialize in curly hair. With that being said, they have created a new miracle gel formula to target frizz.

I was lucky enough to try their new product. I received a small sample size bottle of the Miracle Hair Gel. Because I wanted to see it’s true affect on my hair, and knew the small bottle would not be enough to distribute evenly all through out my hair, I decided to test it out on a smaller section of my hair. I made sure to apply the product in my hair while it was still very wet after washing, I then let it air dry. After it was a hundred percent dried I was able to compare and see the results. The gel had given me nice “S” shaped curls (or ringlets, which ever phrase you prefer). I had VERY nice curl definition with minimum frizz, which I loved! The gel had a light hold and didn’t weigh my hair down at all, nor did it leave my hair stiff but rather soft.

Take a look at how I used the Miracle Hair Gel and the final results:

1. I parted a small section of my hair and washed that section, getting it all ready for the product.

IMG_3489

2. I applied the gel on my hair and then combed it through with a wide tooth comb to help distribute the product throughout my hair.

image2 (6)image1 (4)

3. I then scrunched my hair upwards towards the roots. (Because I apply the product on my hair while it’s still very wet, it is normal to see the product all in between your fingers). I continue to scrunch and hold a few more times.

IMG_3495

4. I used a cotton t-shirt to squeeze out any excess water.

IMG_3497

5. Then I just waited around until my hair dried…meanwhile take a look at what my curls looked like right after applying the gel:

IMG_3493IMG_3496

6. Here are the final results:

image1 (7)

IMG_3500IMG_2298

Want to try this new product for yourself? Purchase the Miracle Hair Gel or learn more about it at www.madonnaandco.com

Until next review my curly loves! xo


Dare to Bare

Still don’t know what to wear on your hot date for Valentine’s Day? Well here’s some inspiration! I found three shoulder baring tops that add the perfect touch of sexy. Tops that show of your shoulders can be fun and flirty, which is why these tops are an ideal fit for Valentine’s Day!

Top #1: American Apparel “Choker Top 

Top #2: Missguided “Long Sleeve Jersey Top

Top #3: Fashion Nova “Mackenzie Top

These tops are perfect for date night. Wear them with jeans and heels for a more casual look. Or dress them up with a sleek pair of trousers, a midi or leather skirt, along with a killer pair of heels and a red hot lip to make things more interesting! (In the photos I paired each top with the bottoms from my “Oh So Tight Set” by Naked Wardrobe and I’m wearing Mac Cosmetics “Ruby Woo” lipstick).

Hope everyone enjoys their Valentine’s Day! xo

Curly Girl Review: DevaCurl’s “DevaDryer”

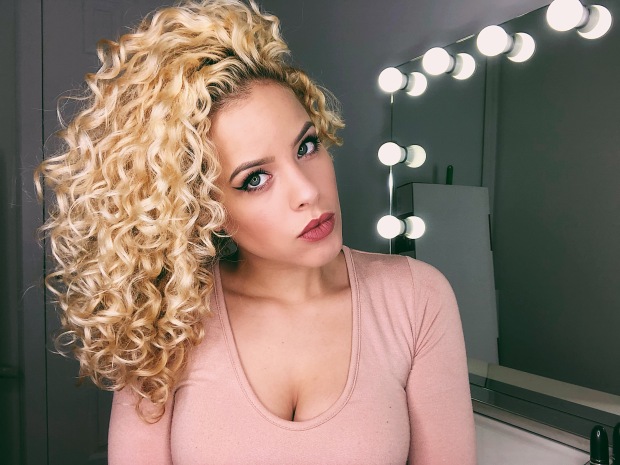
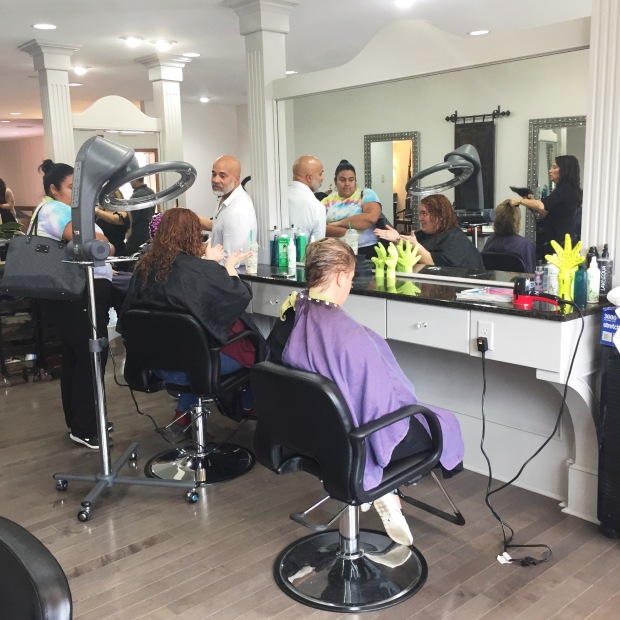
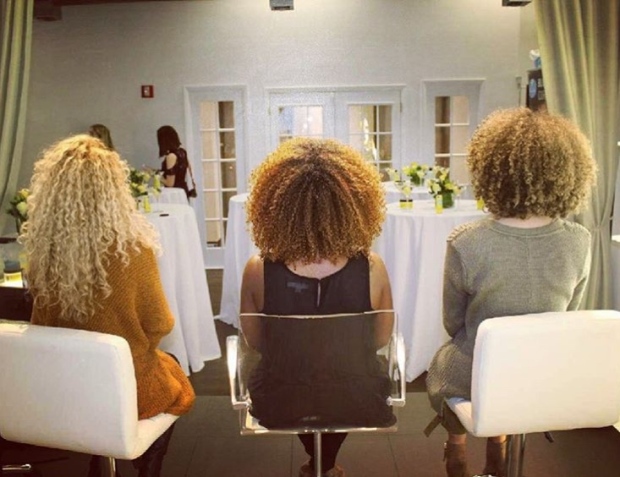
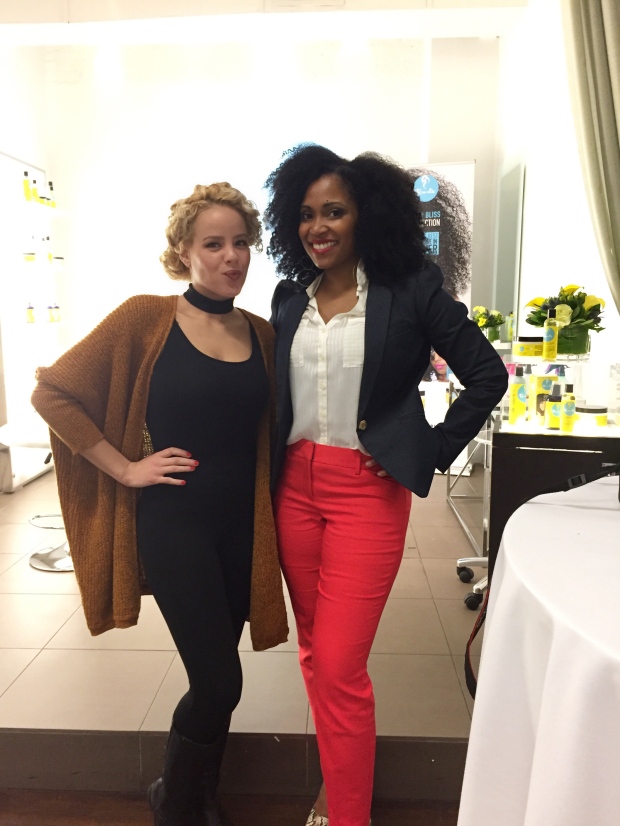
“Joy to the curls” is what the note inside my mystery DevaCurl package said…and when I opened it, JOY it did bring! They had gifted me the limited edition Bright Lights, Big Curls kit which included the new DevaDryer, DevaFuser, Decandance No Poo and One Condition, along with a travel size styling cream. I was beyond ecstatic about this gift and if its even possible to love them more than I do already, well then I do! If you follow me on Instagram, ask for product advice, or have read my Curly Hair Regimen (here) then you know that DevaCurl is definitely on the top of my favorite hair products list. This was an awesome gift! 

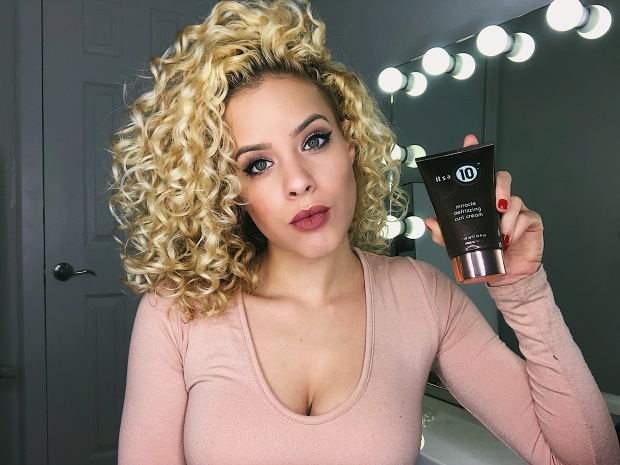
I’m sure you guys are curious to know how it works or if it was any good…well keep reading to find out my final thoughts on the new DevaDryer and fuser as well as pictures of my results!

IMG_5580

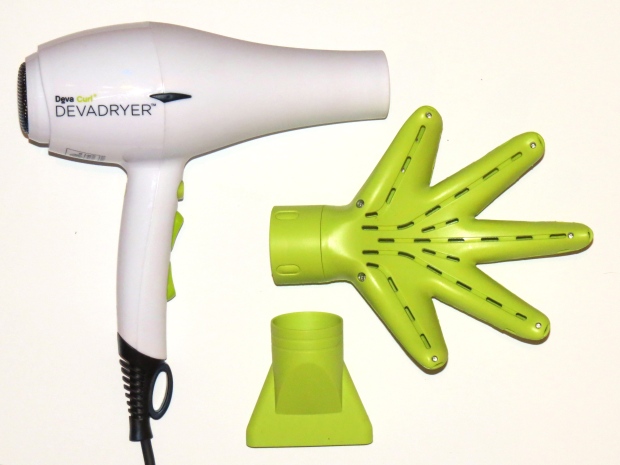
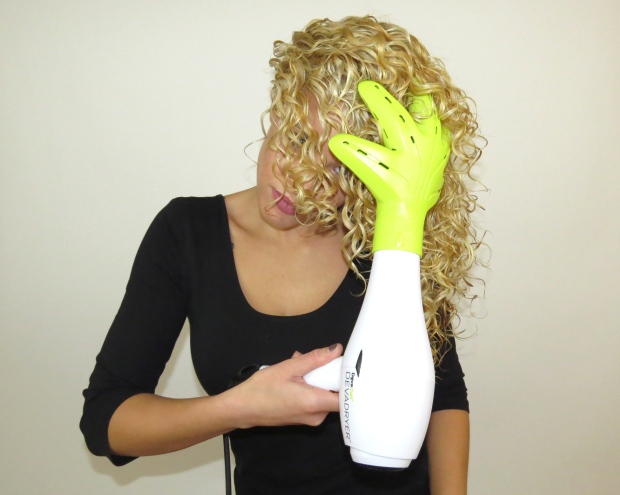
The DevaDryer includes the DevaFuser hand, plus a concentrator nozzle. What makes this diffuser so special you ask? The innovative, hand shaped DevaFuser delivers 360-degree airflow to completely surround curls, even at the root which speeds up the drying process. The patented ergonomic design enhances your natural curls or waves, while creating body and lift due to the positioning at the crown. Unlike other diffusers, the gentle drying of the Devadryer and DevaFuser combined gives you a more defined and less frizzy head of curls.

IMG_5593

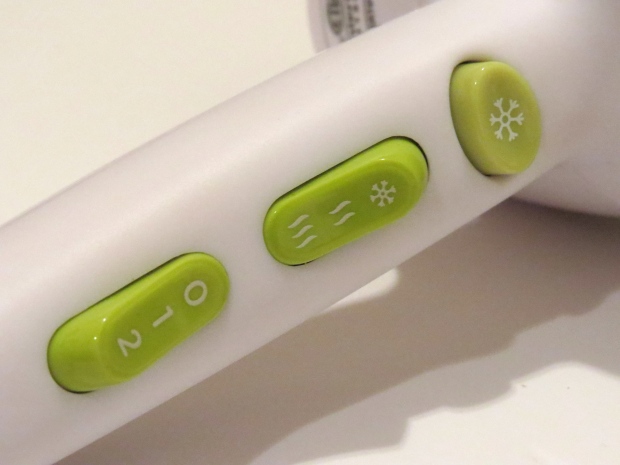
The settings include a cool shot button, temperature, and power/speed button. One of my favorite features on the DevaDryer is that you can choose “cool” as one of the temperature settings. Other diffuser dryers only have the option of a cool shot, which is the button you have to hold down if you want cool air versus heat. However, with the DevaDryer, you have the option of pressing the cool shot button for a quick blast of cold air OR you can actually set it to cool air the whole time you’re using it; without having your finger go numb from having to hold down the button! This is an awesome feature for someone like myself, and here’s why – I usually prefer to let my hair air dry. I try to use as least heat as possible on my hair. However, in the winter I do opt for a diffuser because we all know how long air drying takes us curly folks, and going out with wet hair is not really an option…unless you want icicles for curls. I also use a diffuser to create quick volume when I don’t have the time to do my usual no-heat volume routine (side note: I will be blogging about that routine soon!) Which brings me to the cool setting feature, because I don’t like to use too much heat on my hair constantly, I’ll use the cool setting throughout the whole drying process. I love that they’ve included the choice of a cool setting on the new DevaDryer, this means I don’t have to hold the cool shot button down through the entire process!…After all it is the little things that count! Oh and another big plus is that the dryer is super light weight!

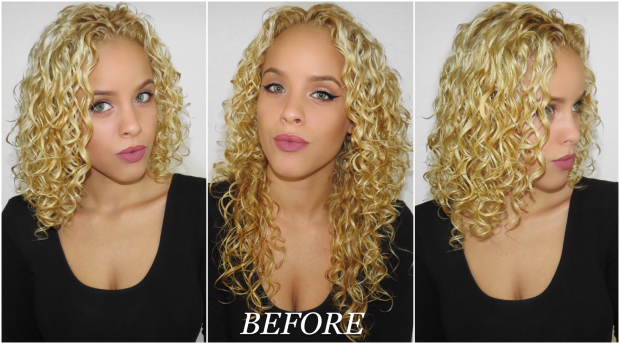
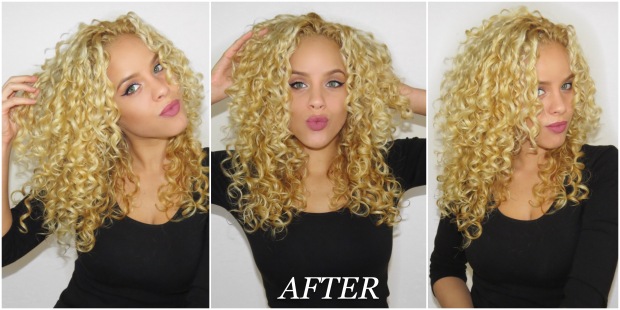
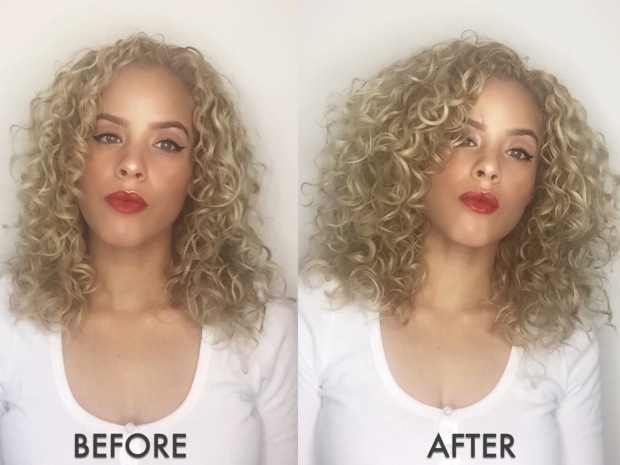
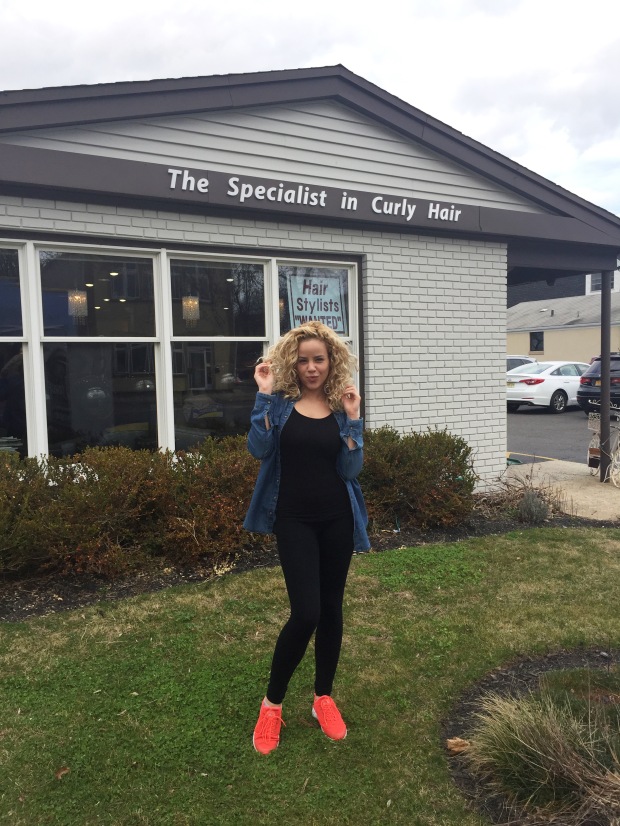
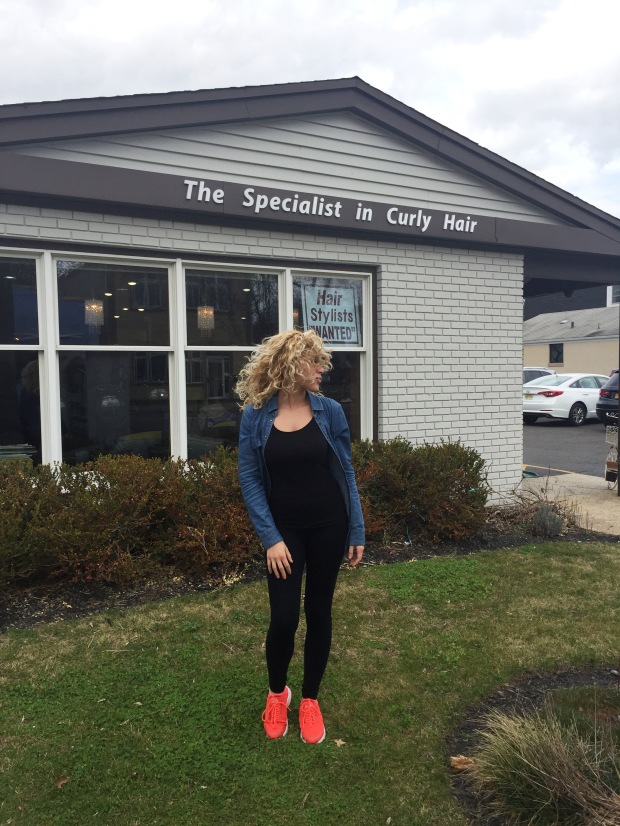
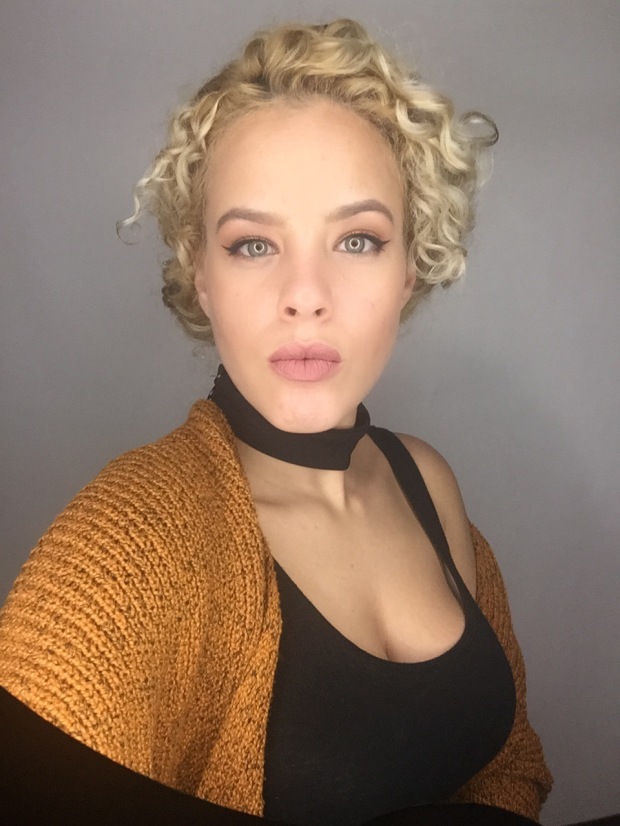
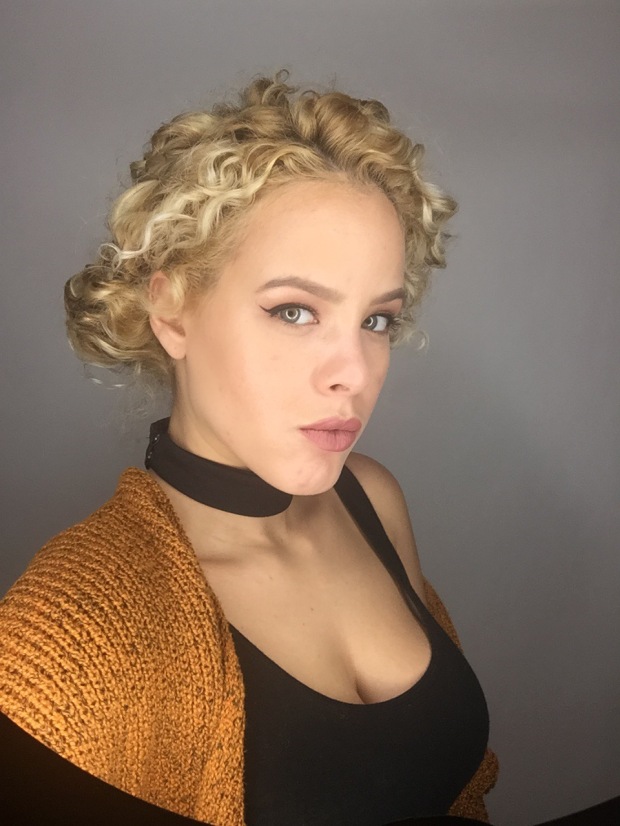
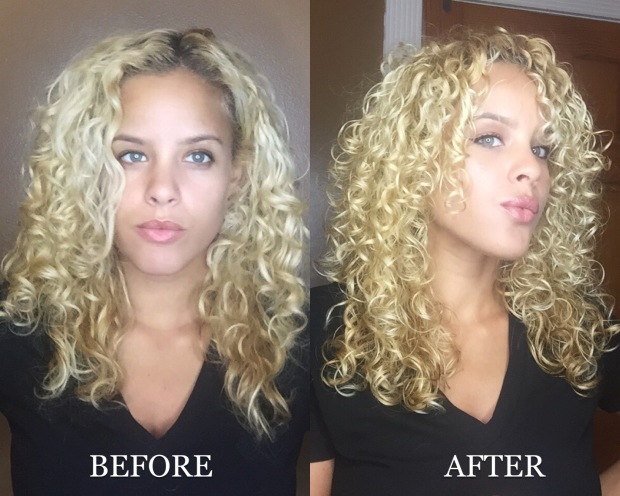
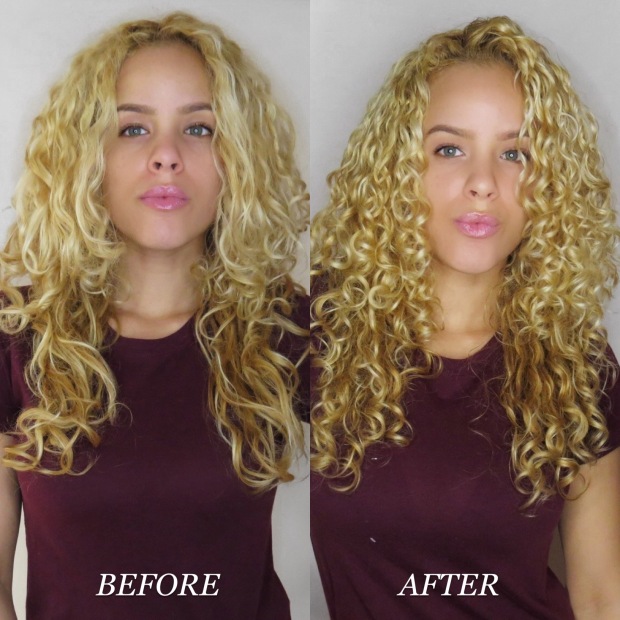
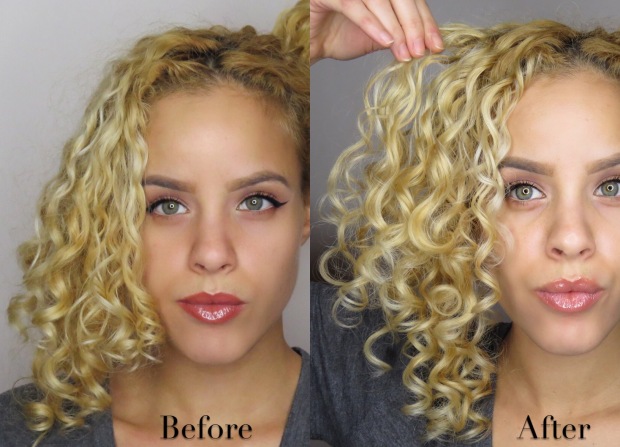
Okay, so now that you know all about the cool features, I’m sure you want to see some results! Am I right?!…Well here are my before and after photos:

IMG_0462

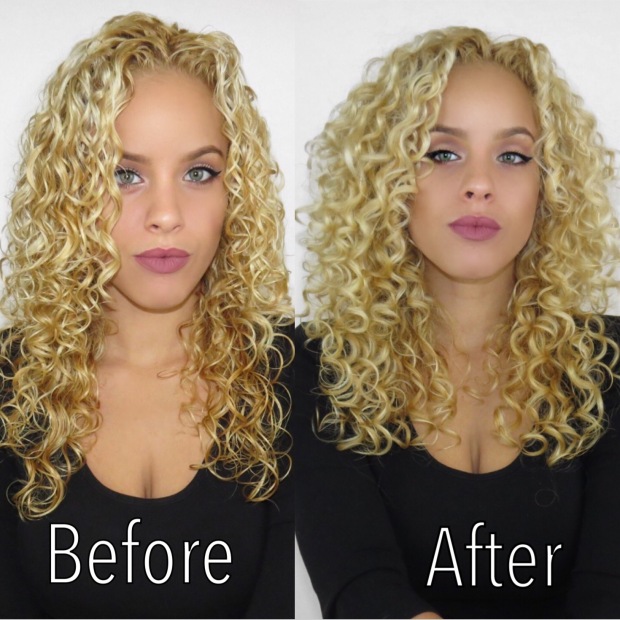
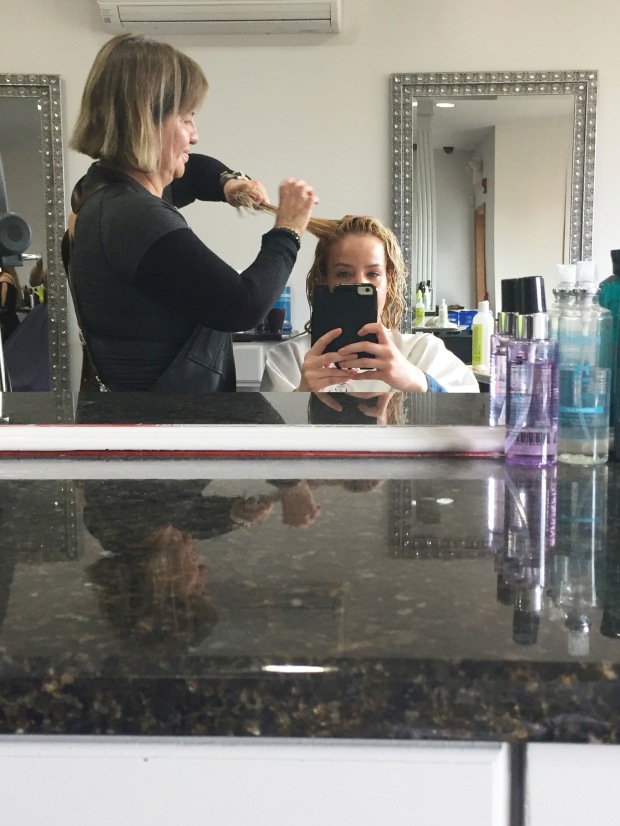
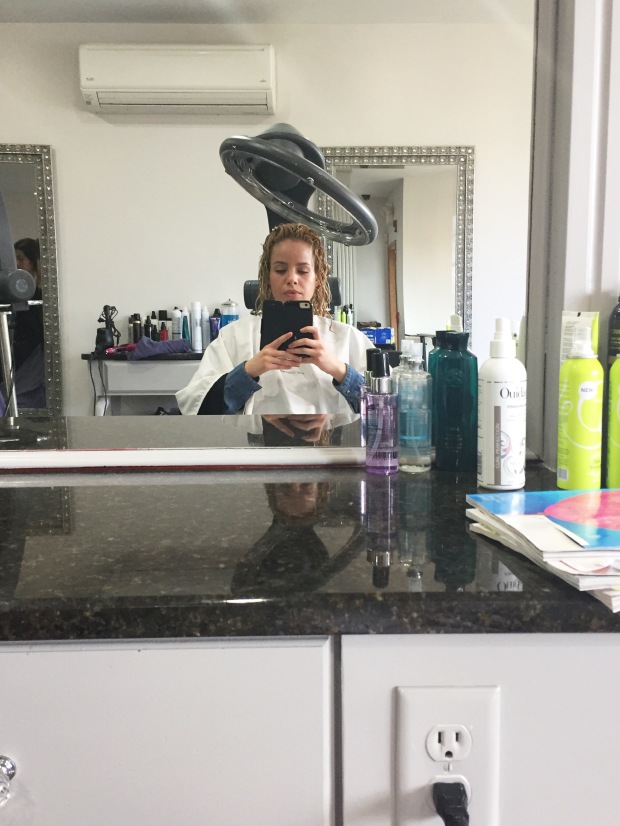
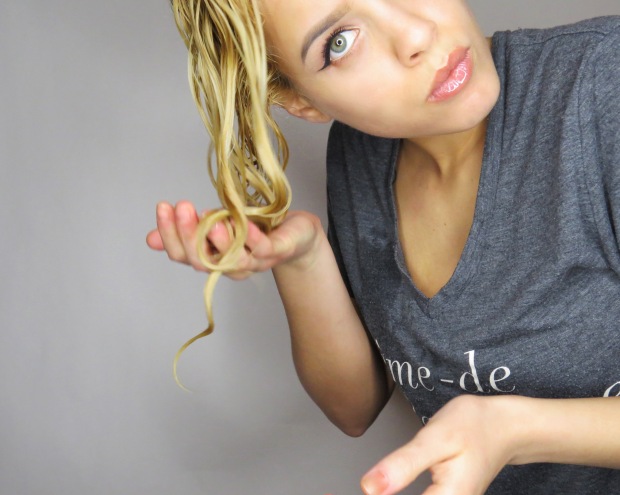
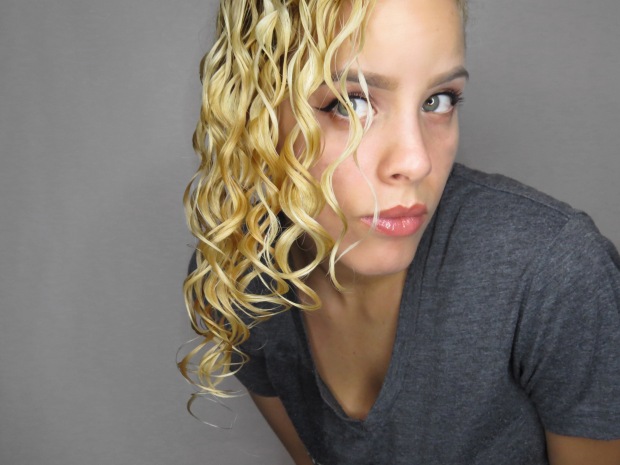
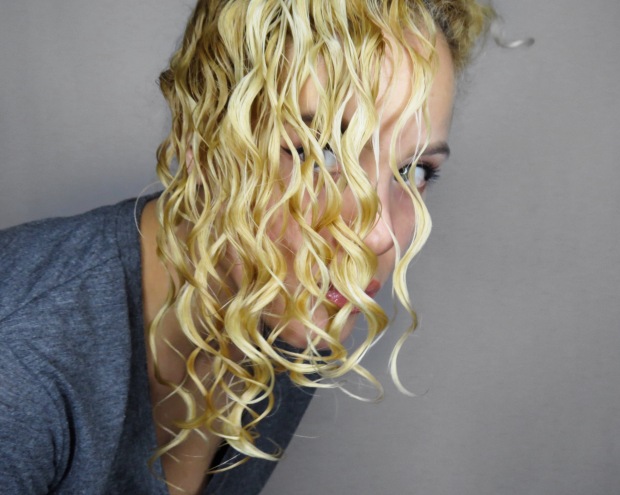
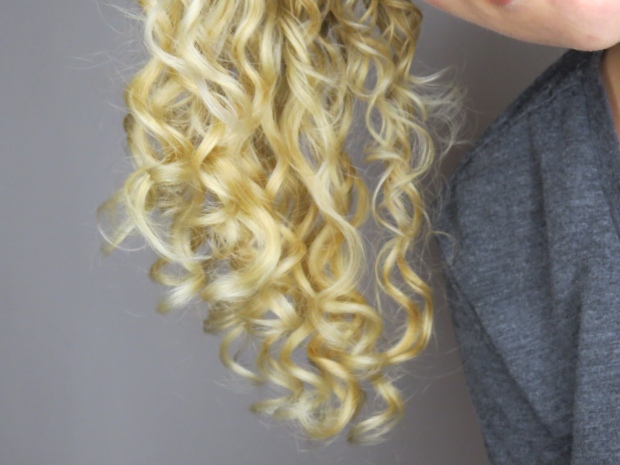
On the left  is my hair after putting my styling products in and still some what wet (click here to see how I apply my product). Here’s a little tip: Try waiting for your hair to be semi dry before blasting it with a diffuser to prevent frizz from occurring. On the right is my hair after using the DevaFuser, it defiantly gave me defined curls with more volume!

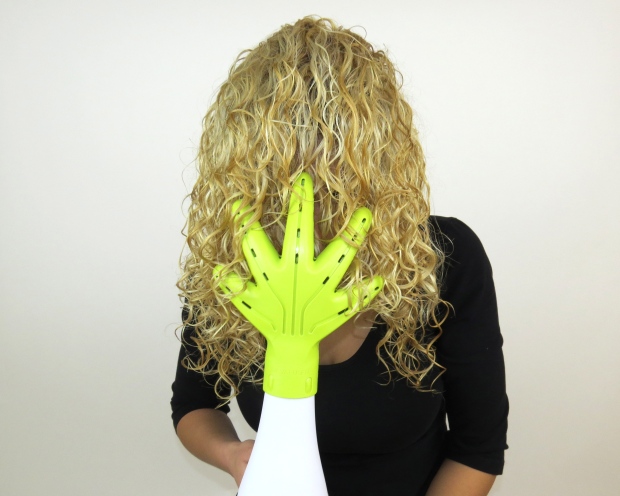
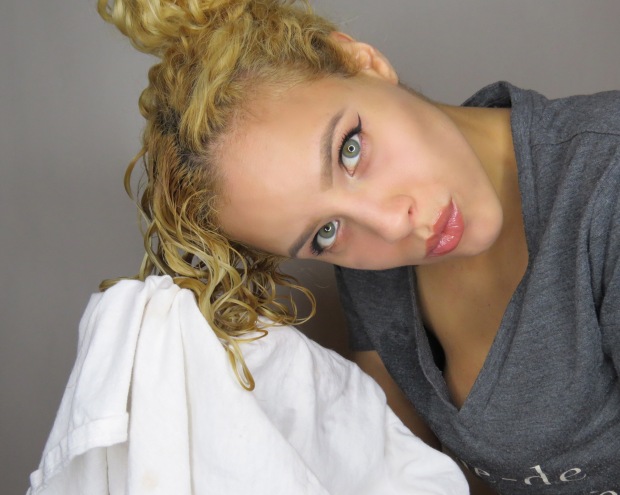
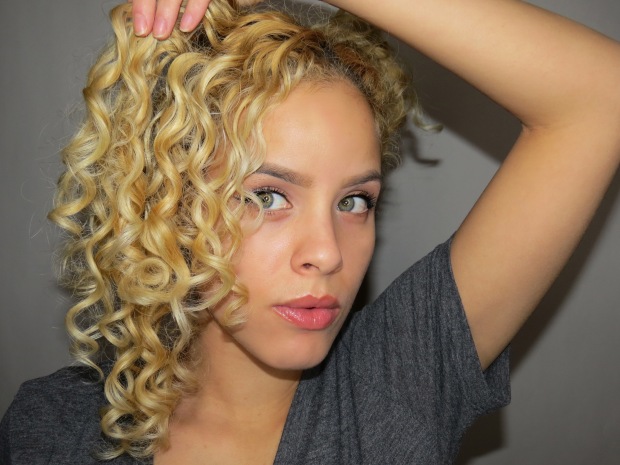
Here’s how I used my DevaFuser to get my results: Flip your head upside down (this will help give you more volume at the roots) and begin to diffuse starting at the ends and lifting it up towards your roots as shown in the photos below. Repeat this step through out your entire head until dried.

IMG_5483IMG_5478

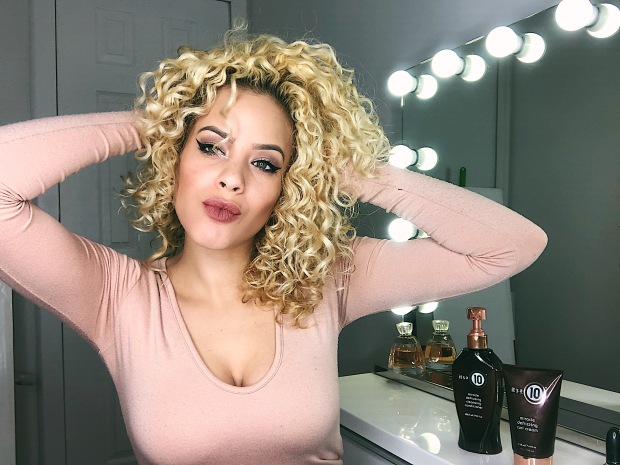
Final thoughts: LOVE IT! The devafuser will definitely come in handy for me. I will probably be using it all winter long. I love how it keeps my curl definition and even enhanced it while giving it some volume. It’s easy to use, has useful settings and doesn’t weight a ton!

image1

image2 (1)

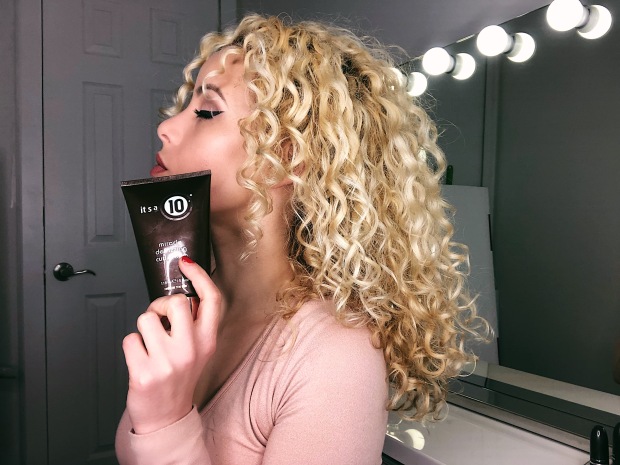
You can purchase your DevaDryer or just the DevaFuser attatchment on their website or amazon.