natural hair

Curly Girl Review: Rapunzel “The Future of Hair”


IMG_7926

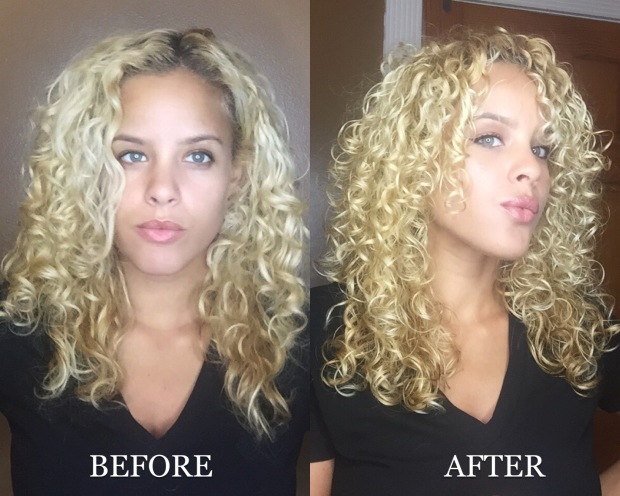
Hey curl friends, who wants to know what hair products I used to achieve these awesome results?! I had the pleasure of trying out some great products from Rapunzel. The end results left me with soft and shiny curls.

I used the following products from the Rapunzel line:IMG_7935
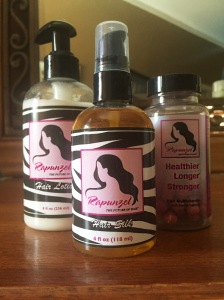
Rapunzel’s Hair Silk: made to smooth ends, condition, and when used daily aids in minimizing breakage and damage caused by chemicals and heated styling.

I loved that this product helps to protect your hair from chemical damage, since I dye my hair often. This oil also gave my curls some amazing shine! You can clearly see the difference in the photo above. In the “before” photo my hair looks dry and dull versus the “after” photo where my curls look shiny, moisturized, and even glisten in the light.

Rapunzel’s Hair Lotion: A deep moisturizing cream made with Shea Butter and other natural oils that promote healthy hair growth while protecting the hair from damage.

I was amazed how soft this cream left my hair…and when I say soft I mean SUPER-DUPER soft! (yes, I said super-duper I had to emphasize on how soft my tresses were! lol)  My comb and fingers literally glided through my hair, melting away any signs of knots that were ever there. It also did a great job at adding moisture to my hair and making it more manageable.

Rapunzel’s Hair Therapy: Hair multivitamins that help prevent hair loss and breakage from occurring.

I have been taking these vitamins consistently for a few days now and I believe I will see results. These vitamins contain a perfect dose of iron, which is an important ingredient when trying to promote hair growth because it carries oxygen to your roots.

Here are some more “after” photos…just because who can resist taking selfies when your new hair products are giving your hair LIFE!…haha.

What do you guys think of my results? I loved the outcome, whats not to love about healthy, silky, and shiny looking curls! If you’re interested in seeing a step by step on how I applied the product press play in the video below:

To find out more information or purchase any Rapunzel hair products please visit Rapunzelthefutureofhair.com
Screen Shot 2016-06-18 at 4.27.45 PM


My Curly Hair Regimen

What’s your hair routine?…What products do you use? has to be the most frequently asked questions when it comes to my hair. Well, my curly headed friends the secret is out!! This is way over due, but I am FINALLY giving you guys my step by step hair regimen. That’s right, you’re getting ALL the juicy details! So who’s excited to find out how I keep these golden curly tresses tamed?! …keep those fingers scrolling to find out!

(Before we get started, I would like to clarify that this is my natural curl pattern and this routine is what I use to enhance and tame my curls. Keep in mind that not everyone has the same curl type, so please do not be discourage if you do not achieve the same results. I am sharing my curly hair routine to simply inspire you to find your perfect curl).

Step #1: First I wash my hair with DevaCurl’s No-Poo. I concentrate more on the roots, making sure to scrub my scalp to loosen up any residue. When I am done scrubbing away, I move on to conditioning my hair with DevaCurl’s One Condition. Once I have applied the conditioner, I part my hair in half and start to finger detangle each section, adding more conditioner if needed. (note: if you are not about that finger detangling life, the next best thing to use would be a wide tooth comb to detangle your hair). After I finish getting all those pesky little knots out, I wash off the conditioner. BUT, I make sure not to fully rinse it out, as I like to leave a little conditioner in my hair. Then, once I’m done washing my hair and out the shower, I squeeze just a little of the excess water out. And I do mean it when I say just a little! I like to apply the product while my hair is some what soaking wet. (Here’s a tip: if you’re in a rush and want to speed up the drying process go ahead and dry your hair with a cotton t-shirt instead of a towel. This will eliminate frizz).


Step #2: While my hair is wet, I sporadically spray DevaCurl’s Set it Free mist throughout my hair.


Step #3: I apply a small amount of One N’ Only Argan Oil starting from the root to ends, combing it through with my fingers (Be careful not to apply too much as it will make your hair too greasy. With this product a little goes a long way).


Step #4: At this point, I grab my handy dandy Light Defining Gel from DevaCurl. First, I take a few pumps of the gel and smooth it onto my hair, from root to ends. I then flip my head upside down and let those tresses hang! While my head is flipped over, I take a few more pumps of gel and with a scrunching motion, I apply the gel onto my ends. I keep scrunching more gel onto my hair, working my way up all the way to the roots. I repeat this step until I feel I have evenly distributed the product all throughout my hair. When I’m all done applying the gel, I keep my head flipped upside down and go back to scrunching the heck out of my hair! (lol). I like my hair to be at its curliest state, so scrunching like crazy will help spring those bad boys right up!


Step 5: After I’m done applying all my products, I slowly flip my head upwards. Now, I just wait for my hair to air dry which takes FOREVER! If you’re in a rush you can go ahead and use a diffuser to speed up the drying process (I prefer to let it air dry). Lastly, after my hair is fully dried I flip my head upside down again and do one more round of scrunching. This removes the “cast” aka the stiffness created by the gel.

That’s all folks! That was my step by step curly hair regimen. Although, I do like to switch it up and experiment sometimes. I have other curly hair routines that consist of using different hair products that I like (I’ll share with you guys another time ;). However, this is my go-to routine. I can always depend on it when I don’t have the time to experiment or can’t risk not getting good results.

Until next time! XO

#CurlPower!

Curly Girl Review: Carol’s Daughter’s “Hair Milk” Collection

If you follow me on Instagram (@style_dose) you would know that I’m a curl lover who’s been on the “natural” hair journey for some time now. It wasn’t always that way, I remember straightening my hair all the time because I wasn’t too fond of my natural curls…I preferred the straight tresses. Until I came across other naturalistas who made me fall in love with the beauty of natural curly hair. I was inspired to go “natural” and bring my curls back to life. I started researching how to properly take care of and style natural curly hair and sooner than I knew, I was learning how to embrace my curly hair. I found myself falling in love with my curls again! I was no longer interested in getting blowouts every week, and if I did straighten my hair, I couldn’t wait to drench my hair in water to make those curls spring back to life.

Along with the love for curly hair, came the love for hair products also. Throughout my hair journey, I must admit I did become somewhat of a product junkie…just a little (hehe). I love trying out new hair products, curious to see what wonders they can work on my curly mane. With that being said, I was super excited when Carol’s Daughter reached out to me about joining their brand ambassador program. Of course I said yes! I was a fan of their hair products even before getting on board, so it was a win win situation. I love coming home to a Carol’s Daughter package, anxious to try out every new goodie they send my way on these curls of mine…and i must say my curls are defiantly fans of their products.

My first package included some products from the Hair Milk collection.  I decided to try a few products together and share the results with you guys!

photo.PNG

  1. Hair Milk nourishing and conditioning cleansing conditioner
  2. Hair Milk nourishing and conditioning styling foam
  3. Hair Milk nourishing and conditioning styling butter
  4. Hair Milk leave-in moisturizer

I used the cleansing conditioner to wash my hair, it worked to cleanse my hair and scalp and get those tangles out! I like to finger untangle my hair in the shower, the conditioner had enough slip to allow me to do so. After rinsing off the conditioner and getting out the shower, while my hair was still drenched, I worked just a bit of the leave in moisturizer throughout my hair from the roots to the ends. My hair seemed to be softer and I do think it helped keep some moisture locked in my curls. Next, I put a few pumps of the styling foam. I must say, I really do like the styling foam! It was light and didn’t make my hair crunchy like other mousse products. I would definitely use the foam on its own for styling. Finally, I put some of the styling butter. The styling butter along with the other products gave my hair a “wet” kind of look. I would probably use less of the butter next time. Not that I think it was a bad product, it works wonders for some people and I still liked the outcome, I just don’t think it works that great with my curl type. Since my hair is not that thick, I find that when I use any styling “butter” or “pudding” of any brand it weighs my curls down so I prefer to use styling products with a light weight formula or just use a tad bit of styling butter.

 Here’s a look at what my curls looked like after using the Hair Milk products:


Make sure to follow my Instagram account @style_dose as well as @carolsdaughter for more hair tips, tutorials, and giveaways! Until next time! xo