blonde

My (updated) Wash and Go Routine


My go-to wash and go routine still includes DevaCurl, but I switched the product line up a bit. This routine has been responsible for most of my good hair days lately…so of course I had to share my new holy grail!

Step by step instructions:

1. Cleanse hair with DevaCurl’s No Poo followed by DevaCurl’s One Condition

2. A good deep conditioning can give your hair a major boost! I like to use DevaCurl’s Melt into Moisture. I apply it after washing my hair, afterwards I put a plastic cap and leave the treatment on for at least an hour.

3. After rinsing off the treatment, do not dry your hair with a towel. (If you apply the product while your hair is still very wet, it will result in more defined curls with less frizz). Split your hair into two parts and apply a little bit of the One Condition (I like to use it as a leave in). Use the raking method to evenly distribute it throughout your hair. Repeat on the other side.

4. Flip your head upside down and gently shake out the roots with your finger tips.

5. Scrunch DevaCurl’s Light Defining gel onto your hair. Keep scrunching the product onto your hair until your whole head of hair is saturated in the product. As you’re scrunching you’ll squeeze out some of the excess water. Also, squeeze and hold for a few seconds to help define your curl pattern.

6. Repeat the scrunching process again, but this time with DevaCurl’s B’Leave In gel

7. Scrunch and shake out your hair one last time. Then take a microfiber towel and  squeeze out all the excess water.

8. Shake out your hair and flip your head back up. You can now go ahead and create a part. I usually part my hair to the side but feel free to do a middle part or let your curls kind of fall into place.

9. Finally, you can air dry or use a diffuser to dry your hair. I prefer to air dry when I have the time.

BA4C1FF9-2F43-422B-9290-DDC8F591442E

Curly Girl Review: Rapunzel “The Future of Hair”


IMG_7926

Hey curl friends, who wants to know what hair products I used to achieve these awesome results?! I had the pleasure of trying out some great products from Rapunzel. The end results left me with soft and shiny curls.

I used the following products from the Rapunzel line:IMG_7935

Rapunzel’s Hair Silk: made to smooth ends, condition, and when used daily aids in minimizing breakage and damage caused by chemicals and heated styling.

I loved that this product helps to protect your hair from chemical damage, since I dye my hair often. This oil also gave my curls some amazing shine! You can clearly see the difference in the photo above. In the “before” photo my hair looks dry and dull versus the “after” photo where my curls look shiny, moisturized, and even glisten in the light.

Rapunzel’s Hair Lotion: A deep moisturizing cream made with Shea Butter and other natural oils that promote healthy hair growth while protecting the hair from damage.

I was amazed how soft this cream left my hair…and when I say soft I mean SUPER-DUPER soft! (yes, I said super-duper I had to emphasize on how soft my tresses were! lol)  My comb and fingers literally glided through my hair, melting away any signs of knots that were ever there. It also did a great job at adding moisture to my hair and making it more manageable.

Rapunzel’s Hair Therapy: Hair multivitamins that help prevent hair loss and breakage from occurring.

I have been taking these vitamins consistently for a few days now and I believe I will see results. These vitamins contain a perfect dose of iron, which is an important ingredient when trying to promote hair growth because it carries oxygen to your roots.

Here are some more “after” photos…just because who can resist taking selfies when your new hair products are giving your hair LIFE!…haha.

What do you guys think of my results? I loved the outcome, whats not to love about healthy, silky, and shiny looking curls! If you’re interested in seeing a step by step on how I applied the product press play in the video below:

To find out more information or purchase any Rapunzel hair products please visit Rapunzelthefutureofhair.com

Screen Shot 2016-06-18 at 4.27.45 PM


Curly Girl Review: Madonna & Co Miracle Hair Gel

miracle gel

A curly girl can never have too many hair styling products! Today, I’m sharing my results after using Madonna & Co’s new Miracle Hair Gel. For those of you who are not familiar with Madonna & Co, it’s a boutique and beauty bar. It’s a place that brings together beauty and fashion all under one roof. Although their beauty bar deals with all hair types and textures, they do specialize in curly hair. With that being said, they have created a new miracle gel formula to target frizz.

I was lucky enough to try their new product. I received a small sample size bottle of the Miracle Hair Gel. Because I wanted to see it’s true affect on my hair, and knew the small bottle would not be enough to distribute evenly all through out my hair, I decided to test it out on a smaller section of my hair. I made sure to apply the product in my hair while it was still very wet after washing, I then let it air dry. After it was a hundred percent dried I was able to compare and see the results. The gel had given me nice “S” shaped curls (or ringlets, which ever phrase you prefer). I had VERY nice curl definition with minimum frizz, which I loved! The gel had a light hold and didn’t weigh my hair down at all, nor did it leave my hair stiff but rather soft.

Take a look at how I used the Miracle Hair Gel and the final results:

1. I parted a small section of my hair and washed that section, getting it all ready for the product.

IMG_3489

2. I applied the gel on my hair and then combed it through with a wide tooth comb to help distribute the product throughout my hair.

image2 (6)image1 (4)

3. I then scrunched my hair upwards towards the roots. (Because I apply the product on my hair while it’s still very wet, it is normal to see the product all in between your fingers). I continue to scrunch and hold a few more times.

IMG_3495

4. I used a cotton t-shirt to squeeze out any excess water.

IMG_3497

5. Then I just waited around until my hair dried…meanwhile take a look at what my curls looked like right after applying the gel:

IMG_3493IMG_3496

6. Here are the final results:

image1 (7)

IMG_3500IMG_2298

Want to try this new product for yourself? Purchase the Miracle Hair Gel or learn more about it at www.madonnaandco.com

Until next review my curly loves! xo


Dare to Bare

Still don’t know what to wear on your hot date for Valentine’s Day? Well here’s some inspiration! I found three shoulder baring tops that add the perfect touch of sexy. Tops that show of your shoulders can be fun and flirty, which is why these tops are an ideal fit for Valentine’s Day!

Top #1: American Apparel “Choker Top 

Top #2: Missguided “Long Sleeve Jersey Top

Top #3: Fashion Nova “Mackenzie Top

These tops are perfect for date night. Wear them with jeans and heels for a more casual look. Or dress them up with a sleek pair of trousers, a midi or leather skirt, along with a killer pair of heels and a red hot lip to make things more interesting! (In the photos I paired each top with the bottoms from my “Oh So Tight Set” by Naked Wardrobe and I’m wearing Mac Cosmetics “Ruby Woo” lipstick).

Hope everyone enjoys their Valentine’s Day! xo

My Curly Hair Regimen

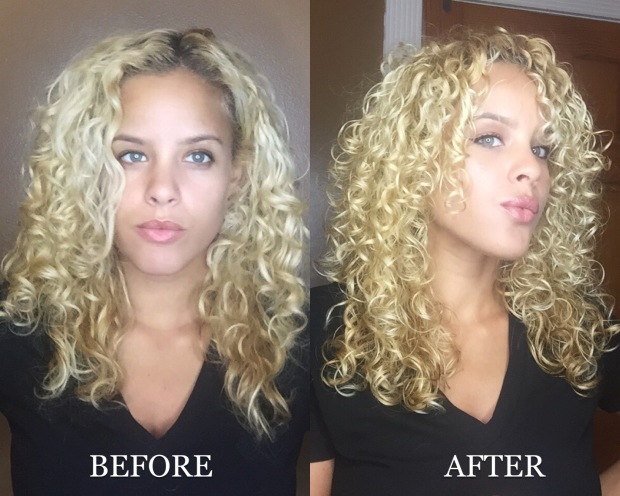
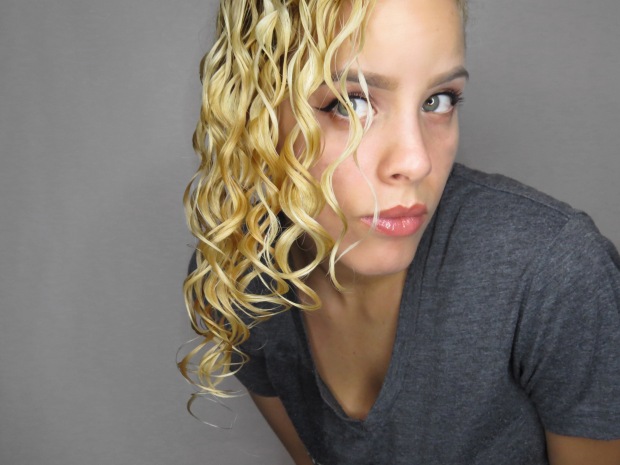
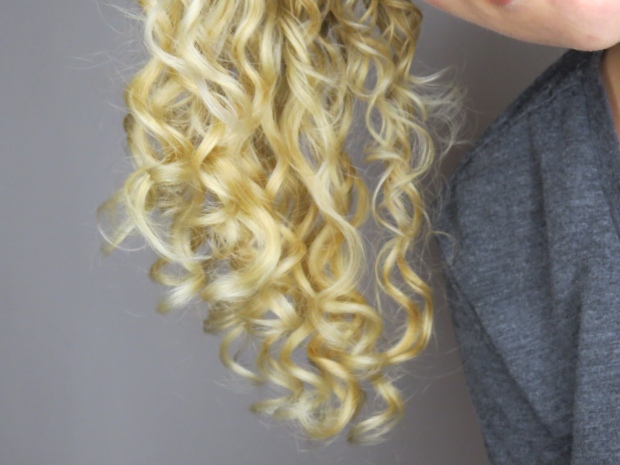
What’s your hair routine?…What products do you use? has to be the most frequently asked questions when it comes to my hair. Well, my curly headed friends the secret is out!! This is way over due, but I am FINALLY giving you guys my step by step hair regimen. That’s right, you’re getting ALL the juicy details! So who’s excited to find out how I keep these golden curly tresses tamed?! …keep those fingers scrolling to find out!

(Before we get started, I would like to clarify that this is my natural curl pattern and this routine is what I use to enhance and tame my curls. Keep in mind that not everyone has the same curl type, so please do not be discourage if you do not achieve the same results. I am sharing my curly hair routine to simply inspire you to find your perfect curl).

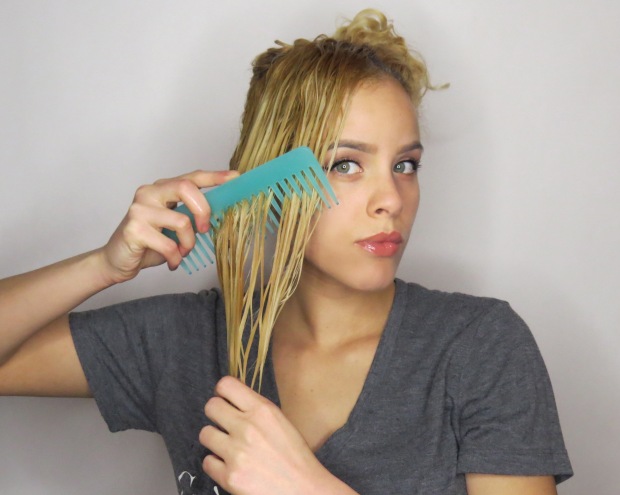
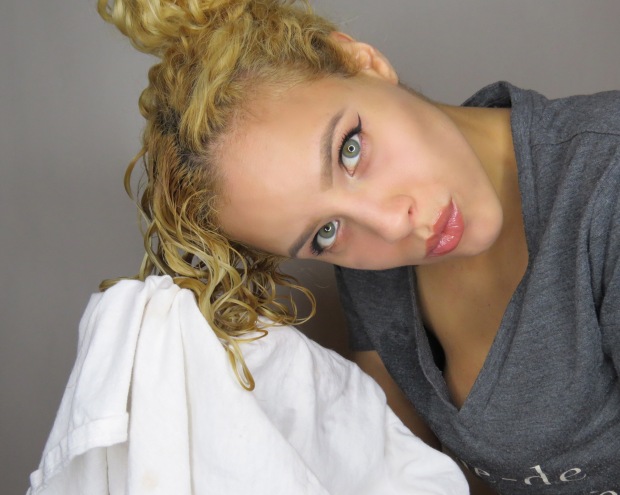
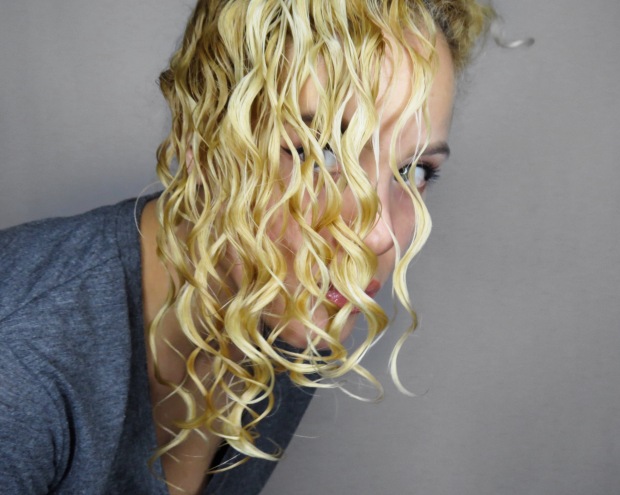
Step #1: First I wash my hair with DevaCurl’s No-Poo. I concentrate more on the roots, making sure to scrub my scalp to loosen up any residue. When I am done scrubbing away, I move on to conditioning my hair with DevaCurl’s One Condition. Once I have applied the conditioner, I part my hair in half and start to finger detangle each section, adding more conditioner if needed. (note: if you are not about that finger detangling life, the next best thing to use would be a wide tooth comb to detangle your hair). After I finish getting all those pesky little knots out, I wash off the conditioner. BUT, I make sure not to fully rinse it out, as I like to leave a little conditioner in my hair. Then, once I’m done washing my hair and out the shower, I squeeze just a little of the excess water out. And I do mean it when I say just a little! I like to apply the product while my hair is some what soaking wet. (Here’s a tip: if you’re in a rush and want to speed up the drying process go ahead and dry your hair with a cotton t-shirt instead of a towel. This will eliminate frizz).


Step #2: While my hair is wet, I sporadically spray DevaCurl’s Set it Free mist throughout my hair.


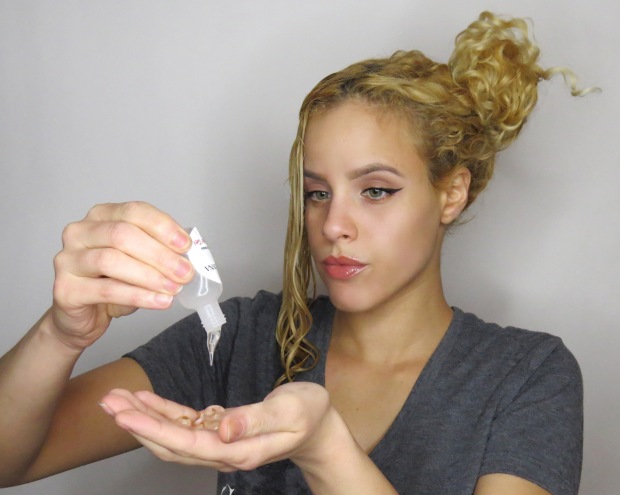
Step #3: I apply a small amount of One N’ Only Argan Oil starting from the root to ends, combing it through with my fingers (Be careful not to apply too much as it will make your hair too greasy. With this product a little goes a long way).


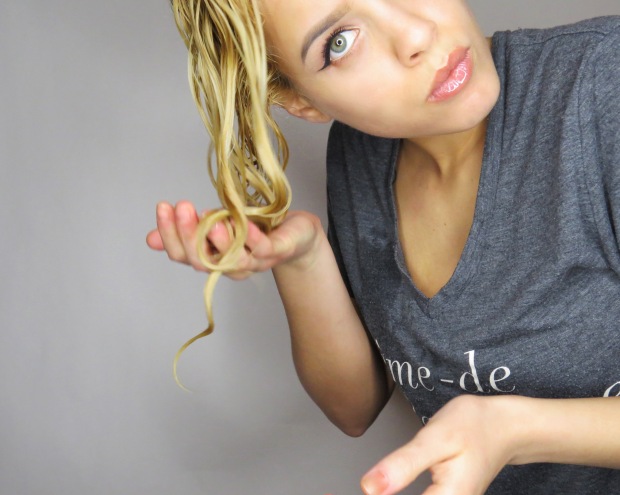
Step #4: At this point, I grab my handy dandy Light Defining Gel from DevaCurl. First, I take a few pumps of the gel and smooth it onto my hair, from root to ends. I then flip my head upside down and let those tresses hang! While my head is flipped over, I take a few more pumps of gel and with a scrunching motion, I apply the gel onto my ends. I keep scrunching more gel onto my hair, working my way up all the way to the roots. I repeat this step until I feel I have evenly distributed the product all throughout my hair. When I’m all done applying the gel, I keep my head flipped upside down and go back to scrunching the heck out of my hair! (lol). I like my hair to be at its curliest state, so scrunching like crazy will help spring those bad boys right up!


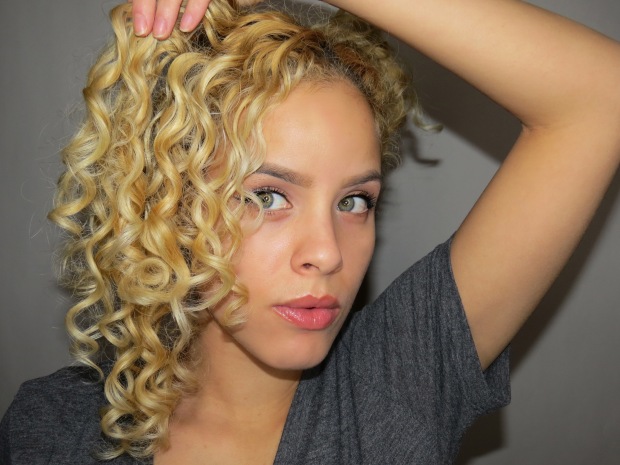
Step 5: After I’m done applying all my products, I slowly flip my head upwards. Now, I just wait for my hair to air dry which takes FOREVER! If you’re in a rush you can go ahead and use a diffuser to speed up the drying process (I prefer to let it air dry). Lastly, after my hair is fully dried I flip my head upside down again and do one more round of scrunching. This removes the “cast” aka the stiffness created by the gel.

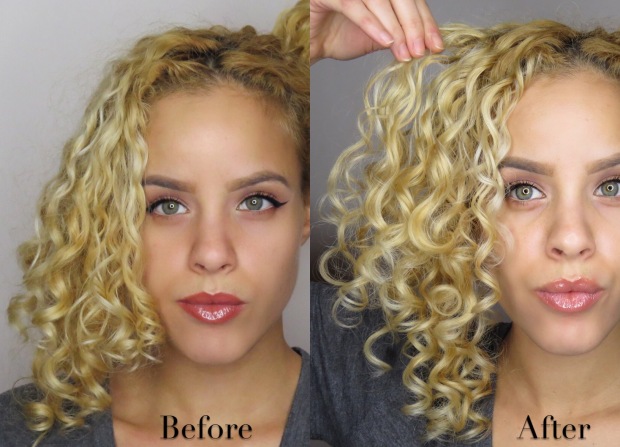
That’s all folks! That was my step by step curly hair regimen. Although, I do like to switch it up and experiment sometimes. I have other curly hair routines that consist of using different hair products that I like (I’ll share with you guys another time ;). However, this is my go-to routine. I can always depend on it when I don’t have the time to experiment or can’t risk not getting good results.

Until next time! XO

#CurlPower!

How To Achieve Voluminous Hair Without Heat

As a curly girl, I try not to use any heat on my hair in order to avoid heat damage. However, every now and then I get the itch to blow out my curly locks. Technically, you shouldn’t use any heat on your curls in order to maintain healthy curly locks. I believe if you do it only once in a blue moon and take proper care of your hair, it won’t cause major damage. Besides, isn’t the versatility of having curly hair one of the biggest perks of being a “natural” ?! You get the best of both worlds…you can go from big curly hair to a sleek straight do and the options don’t end there!

When I straighten my hair, I prefer to have some body versus pin straight hair. There was one little problem with that…the more volume and body I wanted, the more heat I had to apply to my hair. When I used to straighten my own hair, I would use a curling iron afterwards to give my hair a little body and bounce. Once I started taking better care of my hair and tried cutting out using as much heat as possible, I had to come up with ways to create voluminous hair without using heat appliances on my tresses. That’s when I came up with my new hair routine to achieve voluminous hair. Keep scrolling to see how I do it!

volume pictorial

After you straightened your tresses, follow the steps below:

1. Split your hair into four even sections. Clip three of the sections, to keep them from getting in the way while you work in one section.

2. Grab about an inch of hair and with your fingers start rolling that piece as if you were putting it into a roller securing it with two bobby pins, one on each side (start from the bottom, rolling it up towards your scalp).

3. Repeat step 2 until you rolled up every piece of hair in each section. I usually do this right before bed and go to sleep with it. You can choose to do the same or you can do this throughout the day before heading out or while you get dressed and do your makeup. The longer you leave the rolls in the more body you will achieve. Once you unpinned your hair, go ahead and run your fingers through your hair to loosen up the curls and spray a little hairspray if you choose (but just a little, you don’t want it to be too stiff).

Here’s what my tresses look like after I take out the rolls:

 Thanks for stopping by! xo

The Devachan Salon Experience

I’ve been way over due for a haircut! So I decided to pay the curl experts at Devachan Salon a visit. It was my second time going to Devachan Salon, and obviously I loved it! For those who aren’t familiar with Devachan Salon, it’s a salon that caters to curly hair. YES!…you read correct, I said curly hair! How awesome is that for us curly gals?! It’s so tough to find a place where they specialize in curly hair. We usually walk into a salon ready to tackle our curls with the blow dryer and big round brush in order to straighten our tresses. However, when you walk into Devachan Salon, it’s like walking into a whole new world where curls rule! Curls are all around you and suddenly you feel right at home as you let those curls spring around, anxious to get your curly cut and hydrate those thirsty curls. They do what’s called a dry cut, where they cut your hair dry while focusing on each curl to make sure it falls in the right place. It makes so much more sense to cut curly hair while it’s dry in its natural form. You can actually see how much you really want to cut off and not risk the chance of cutting it too short.

I was so eager to try them out after hearing so much good things about them, and I must admit they lived up to my expectations. I was so pleased with my curly cut, and after the hair cut my curls seemed so much more defined and well-behaved. I also noticed that my hair began to grow so much quicker! I didn’t however, love the way they styled my hair after the hair cut. It wasn’t that they did a bad job it looked okay, it was just styled too neat for my taste. I prefer big hair, I like to have some volume, but that’s just me. If you like your curls more on the tamed side and you aren’t a fan of big hair then you would probably dig their styling. Check out my after photos; I snapped some quick photos of both the way they styled it at the salon and after I tweaked it myself to create some more volume.

“The After” haircut and styling done at Devachan Salon:

IMG_3706

IMG_3717

IMG_3703

IMG_3707

IMG_3715

“The After” haircut done at Devachan Salon and styling done by myself:

IMG_3721

IMG_3731

IMG_3719

IMG_3761

IMG_3746Thanks for stopping by loves! xo.

Golden Girl

Are you still searching for that perfect holiday outfit? Well then, it’s a good thing you decided to pay Style_Dose a visit! Today’s post will hopefully inspire some holiday worthy outfits. I, myself was actually looking for some holiday outfit inspiration when I came across a gold sequin cropped top in my closet. The gold and sequin combination had holiday written all over it! So the star of today’s post will be…yup, you guessed it! – That little gold sequin cropped top. I put together two different looks with this one top, hope you guys like it!

Note: All the pieces I am wearing are all older. However, I did my best to find similar pieces for you guys! Keep reading to get the details!

OUTFIT #1

GOLDEN GIRL

IMG_2340GOLDEN GIRLTop: Joyce Leslie (similar one here) // Pants: Rampage at Macy’s (similar ones here) // Shoes: Easy Pickins (similar ones here)

OUTFIT #2

GOLDEN GIRL2GOLDEN GIRL2GOLDEN GIRL2

Skirt: BCBG (similar one here and here) // Thigh High Socks: American Apparel (here) // Watch: Michael Kors

I had forgotten all about this little gold top – isn’t it the best when you find hidden treasures in your closet?! For outfit number one I went for a more simple look, pairing the top with my black high waisted pants. I felt like the shirt made a statement all on it’s own so pairing it with simple black pants would still make the outfit stand out. As for outfit number two I wanted to go for a more trendy and flirty look. I decided to pair the top with my black body-con skirt that I hiked up a bit in order to rock my thigh high socks. I thought the thigh high socks made the outfit look a bit more trendy.

Now here are some close ups of my hair and makeup:

IMG_2453IMG_2452IMG_2478IMG_2488

Hope you guys find some inspiration from my post. Happy Holidays! xo.